
Introduction
Having sorted out my house for Solar Hot Water and Solar PV in the last couple of years, my attention turned to my central heating system (GAS System Boiler) and specifically my radiators and the temperatures of the rooms in my house.
I wanted to:
- know what the temperatures of many of the rooms of my house were at any time
- see how quickly they warmed up when the central heating was on
- see how quickly they cooled after the heating was off
I wanted to know if I was wasting money heating rooms when I didn’t need to.
… and of course I wanted to use some tech to do it, Raspberry Pi, Radio transmitters, etc.
Design Goals:
- The sensors had to work from battery (and use minimal power so it lasted for months)
- The sensors had to be minimally intrusive and wireless – so they can be easily moved
- The system had to be reliable and hassle free – it does not need to be real-time – near-time is OK.
- The results had to be presented in an easy to use browser based graphical way
The Results:
So this is what the final solution looks like through a browser:
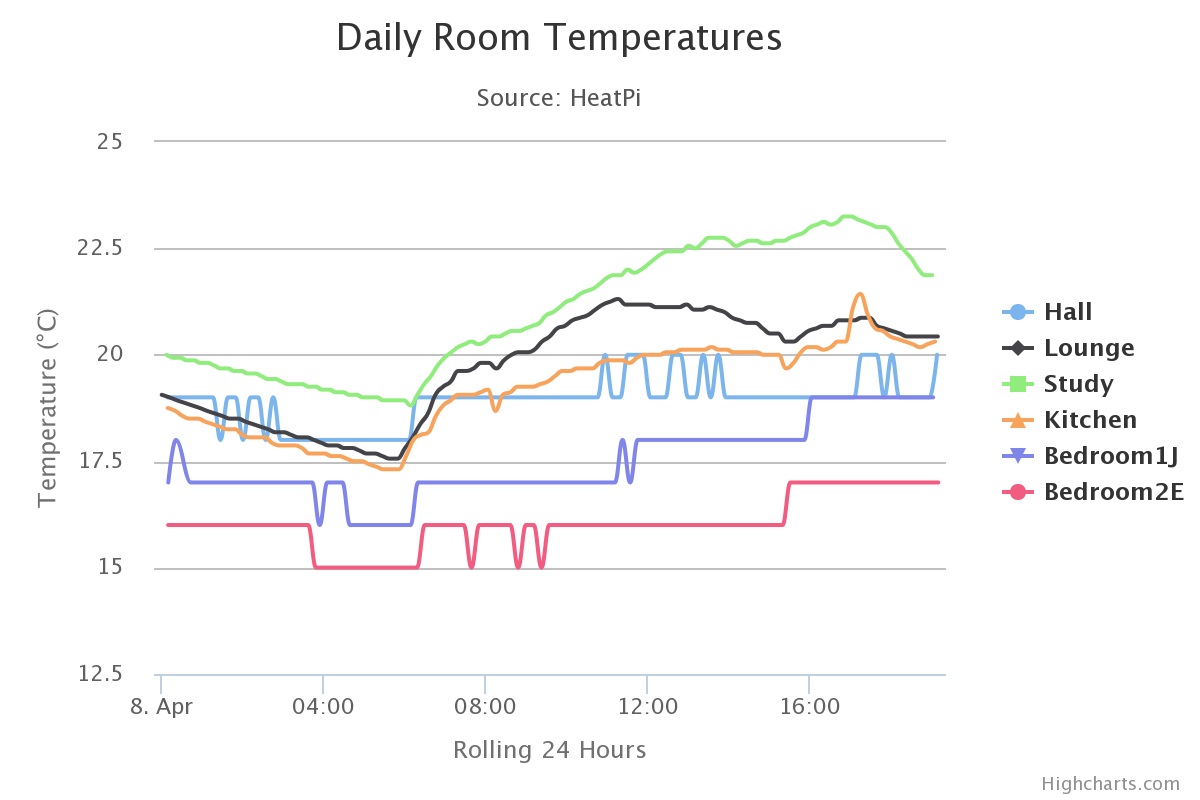
This shows the temperature of 6 rooms from my house.
What have I learnt about my house?
Through creating this system, I have learnt the following:
- The study (part of an extension and with two external walls) keeps it heat as was often above the temperature of the other rooms, even though it is not a main room in the house. –> I have turned down the radiator in this room. (it is still warm!)
- The radiators in the lounge were not producing enough heat. It is a large room. So I re-balanced them and turned up the input flow.
- The overnight heat loss of the house is low (i.e. very good) – this reassures me that the money I spent on lagging the loft and the cavity wall insulation is working well.
How does it all work?
The diagram below shows the physical architecture (on the right) and the logical (software) architecture on the left.

Sensors
For the sensors I used the excellent Moteino products from LowPowerLab. These are Arduino compatible devices with built in radio transmitters and have excellent library support. They are also capable of going into a deep sleep and using little power. They are powered directly from a 9V battery.
For measuring the temperature I am using the veritable DS18B20 digital temperature sensor. I put these together in a case (from Ebay) that was designed to safely store two PP3 9V batteries – there as just enough room! So a sensor looks like this:

I deliberately chose a see-through case, because I like tech; but you could find a black case to make it more unobtrusive.
Receiving Node/Raspberry Pi
To receive all of the temperature signals, I am using another Moteino, but this time one with a built in USB connection. It is connected directly via USB to the Raspberry Pi.
Software Architecture
All of the code, as usual with me, is on GitHub and can be found here. The credit for the libraries to drive the radio’s in the Moteino’s goes to LowPowerLabs.
Nodes
All of the Moteino nodes that measure the temperatures run the Nodev4 code. Basically all this code does is:
- initalise
- @ read temperature
- transmit node-id:temperature
- power down radio
- put Arduino to sleep (for 15 minutes)
- repeat @
Gateway
The gateway Moteino does several jobs. It has its own temperature sensor, every 15 minutes the raspberry Pi asks for the temperature from this sensor. The Gwayv4 code:
- Responds to requests for the temperature of the local sensor from the Raspberry Pi
- Receives transmissions from the other nodes, checks and formats the data and sends to the Raspberry Pi.
Raspberry Pi
The Raspberry Pi does all of the other work.
- The process-data-v2.py script runs in the background as a daemon. It:
- receives data from the gateway node
- stores data in the SQLite3 database
- Asks the temperature sensor on the gateway for its temperature every 15 minutes
- The SQLite3 database stores all of the data (see the install directory on Github for the creation script and the schema)
- The hourly-query.py script queries the database for data and formats it into a html format that HighCharts understands. This script is called from cron along with the makehtml.sh script.
- The makehtml.sh script takes the output file of the hourly-query.py script and tops and tails it with the necessary HTML so that HighCharts can understand it. It then copies the file into the webserver directory for serving.
Webserver and Highcharts
The web-serving is done by lighttpd and the heavy lifting of creating the charts and the graphics is done by the excellent Highcharts, which is free for personal use and which I thoroughly recommend.
Improvements, to-do’s and etc.
The solution has worked perfectly since I finished it in late November 2014, and the PP3 battery on each sensor has lasted for over 4 months now, Which is good.
The sharp-eyed among you may have noticed that the temperature traces for the Hall and the two bedrooms only have a resolution of +-1 degree, where as the other temperature sensors have a much higher resolution. This is because I discovered that the radio in Moteino’s also have a temperature sensor! So I saved myself some soldering and used some example code to access this temperature.
Future improvements I have yet to do would be:
- add more sensors (perhaps using different sensors)
- use the Range Selector functionality of Highstock to implement a web page where you can choose the time window you want to view.
Thanks
I hope you enjoyed reading this blog and that you can re-use some of what I have done for your own purposes! Gaz99

Thanks for the useful writeup. I’m planning to move house soon and was thinking about a similar system. Another similar board I’ve been looking at for it is the panstamp NRG which has a temp sensor already on the board (http://panstamp.com/store/index.php?id_product=26&controller=product).
ps no I’m not linked to the company and haven’t actually tried it yet but thought people may want to consider it.
Hi mole125, thanks for the feedback and the useful link. Looks like a useful board. I will keep this one in mind. Gaz99
I have a similar project in mind (though I think I not have a problem just wiring things up rather than wireless) – have you considered the possibility of putting auto-adjustment actuators on dampers/pressure adjusters so that the system balances the temperatures in the rooms dynamically?
Hi,
yes, absolutely! The next project – perhaps only for some rooms that are less used. I have been looking at these.
http://www.eurotronic.org/produkte/comet-blue.html (its in German 🙂 )
you can buy them for €25 they are programmable over Bluetooth Low Energy. all other “UK” solutions I have seen are around the £50 mark, which is too expensive. cheers Gaz99
What sort of range are you getting from the Moteino? Did you have trouble with walls/ceilings etc?
Hi Rex,
Good is the short answer, with the short-wire aerials, no issues at all from anywhere in my house. The gateway node is in a ground floor room front left of my house and one of the bedroom sensors is first floor back right, so through several walls no problem.
Hope this helps
Gaz99
Hi Gaz,
Could you provide some details about using the on-board Monteino radio temperature sensor.
Cheers
Hi Jamie,
have a look at the code on github, nodev9.ino file. It is quite straightforward:
#include

#DEFINE OFFSET=-1
byte temperature = radio.readTemperature(OFFSET); // adjust for ambient temp
This reads the temp of the radio; adjusts the temp by the value of OFFSET ; and stores the value in “temperature”. It is always an integer.
Gaz99
hmm. WordPress does not like the first line of code. it should be a hash include “lowPower.h” using angle brackets instead of “”
Super easy! Have been eying off the monteino for ages. Think it’s time I ordered a few 🙂
Thanks for getting back to me.
Is it the on board sensor that is 1 degree precise or your custom sensors?
Hi – it is the on-board sensor on the Moteino
regards
Gazz99
Just wondering if you can share more info about power consumption of the nodes? How long they last in your case? Did you measure mAmps in sleep mode? Maybe it is a good idea to measure battery voltage of each node and add some low battery alarm.
Hi ngd,
I have not done any measurements. what I can say is that I have been running them from 9V batteries since November until now without having to replace a battery, so that is 6 months so far.
regarding the measuring the battery voltage this is not needed – for this solution – if a node goes below a voltage so that data is not transmitted, I will see that a data line is missing, and replace the battery,
regards
Gaz99
Any update on the power consumption?
Hi kuntha, I am finding that the 9v rechargeable batteries are lasting > 9 months between re-charging. I keep one charged 9V battery as spare and swap out when a sensore “disappears” from the graph.
Thanks
you are welcome.
I just bought 8 of these units – 1 for gateway and 1 each for 7 rooms to monitor. Bought weathershields so I can monitor humidity as well.
Now comes the hard part, never having used Arduinos before and knowing nothing about this particular hardware either – just figuring out how to stack the weathershield on the moteino has required quite a lot of searching! 🙂
Good luck with your project. If you write it up please post back a link, I am sure we would be interested in reading about it.
I’m new to Arduino as well but have quite some experience on Raspberry Pi. Could you provide a tip/link to get started with the Moteino RF development?
Also, I’ve notices that there are quite some boards out there:
– Feather by Adafruit
– Moteino
– Slice of Radio by WirelessThings
– LoPy
– Talk² Whisper Node
– etc
Why did you choose the Moteino?
Hi kuntha, thanks for your continued interest. You can find out about the Moteino’s here: https://lowpowerlab.com/
The libraries are stored here: https://github.com/lowpowerlab
Why did I choose Moteino, well some reasons I stated in my blog, but actually at the time, it was the smallest, most available and cost effective solution that I could find.
I also think Felix Rusu (inventor of Moteino) is a cool guy and does some great stuff.
I have not revisited the marketplace, so who knows, maybe things have changed.
The completeness of the software libraries was a big factor for me as I am not a very good low level/C programmer.
Hope this helps
Gaz99
Hi Gaz99, thanks a lot for all your replies. Good to see your devices run for over half a year, that’s nice! I’ll probably start testing with 9V as well and later test some Li-SOCl2 like the ones used here: https://www.wirelessthings.net/wireless-humidity-temperature-sensor and here: https://www.hackster.io/paulkanz/wireless-temperature-and-humidity-sensor-with-encryption-8c3009
Still not sure about the sensor though, there are so many available but they all have one particular drawback (e.g. high consumption, low accuracy, slow measurement).
All the best
Gaz99,
Can you provide more information on your config file for lighttpd?
Hi Ray, travelling with work , will upload to Github and post tomorrow. Having said that, it is the standard file, I just changed the port number to what I wanted.
Ray – the lighttpd.conf file has now been uploaded to Github, look under the install folder here: https://github.com/naylogj/heatingpi/blob/master/heatingpi/install/lighttpd.conf
Gaz99,
Just getting into the Rpi world and have a project in progress to monitor temperature in different “zones” in the house, then use this input to open/close registers using servos to balance out the temps between zones. I have lots of hot/cold spots, poor HVAC design.
Question is, what parts exactly did you use for the sensors? I’m a little confused trying to figure out what I need to buy in order to make a functional wireless sensor.
Thanks!
hi Bfluit, thanks for the interest. for the sensors I used a Moteino, which is an Arduino with a built in radio. Have a look at http://www.lowpowerlab.com they are made in the USA, so incur import taxes to UK where I am. For temperature to plus/minus 1 degree, you can just use a moteino and a 9v battery, as the radio has a built in temperature sensor. I also used a Dallas DS18B20 digital temperature sensor for more accurate readings. Have a read of the blog, all the code and how it is architected is all there. Good luck, Gazz99.
Hi, thanks for the cool writeup!
Like Bfluit I have some experience with Raspberry Pi but none yet with the Arduino, could you provide some more details about the setup with the moteino/arduino? Perhaps a schematic for the battery and the temperature sensor.
Also, coming from an OS micro controller where you have an OS installed it might be useful to have some information about how one “installs” code on a board like the Moteino? – Is this the proper way: http://lowpowerlab.com/programming/?
Kind regards
Here’s an interesting comparison of some sensors: http://blog.openenergymonitor.org/2016/07/HTU21D-Temperature-Humidity-sensor
It seems to be hard to find one that has low power consumption, is responsive (fast) and accurate (.2 degrees Celsius).
Did you test DHT, SHT or any other sensor?
Here’s a link to a similar project but without the Moteino: http://www.allaboutcircuits.com/projects/how-to-make-a-wireless-thermometer-with-arduino
With your hot/cold spots, a thermal images would help you to locate places where you have issues with
Cold bridging
Lack of continuous insulation (or any at all)
Could areas around air gaps
IMO looking into why it’s cold first before increasing complexity with controls is the best route.
Is your HVAC system forced air/’furnace’?
There can be issues with shutting too many zones on a forced/furnace/central air system.
In the UK we more typically have ‘hydronic’ wet heating with hot water pumped to ‘radiators’ (actually passive convectors, but misnamed as historically we did have radiators) in rooms (under the windows please for more than one good reason!!).
Could you provide a schema of a Node? I’m interested how you hooked up the voltage and the sensor. Also 9V would be too much for a Moteino according to this blog post, did you apply a circuit to change the voltage?
hi Kuntha , I will try and draw the circuit and post when I have time.
regarding using 9v – this is fine the Moteino has a built in regulator.
I will be building an identical installation at my place. With me luck 🙂
Good luck – let me know how you get on. Several years in my installation is still working 🙂
I’ve been looking into an arduino esp8266 (wifi) based gateway (to replace the RPi) that uses the mqtt protocol and it looks very promising.
See https://www.mysensors.org/build/esp8266_gateway
Did you consider wiring a rfm12/69 directly to the pi GPIO?
The study was probably buit to modern u-value requirements and air tightness standards. Also if it has windows and external walls you’ll have solar gain when the sun’s shining.
I have been wanting to get a similar project off the ground for ages. I now have a collection of sensors: temperature and humidity are sensiron sht21 (1 usb/hid and 2 i2c), a few bmp085 air pressure, and a couple 433mhz outdoor temp/humidity sensors. I have two moteinos (which were insanely expensive to import to the UK). And various other Arduinos.
My oldest raspberry pi is still uploading to xively which was cosm/pachube. Personal feed ID 84436 I think.
I originally directly attached the currentcost envir display to the raspberry pi GPIO as the CC has TTL (3v) serial port. So its using the CC lcd RJ45 8P jack pins 3v, GND and TX pins. Powering straight from the pi means no adaptor/wall wart. That’s not connected right now as I’m in the process of moving, but the temperature and humidity and air pressure under the stairs there are still live! I meant to blog about that system, never got a round tuition lol.
Have you heard of OpenTRV? It’s a neat way to control heat to individual rooms.
Of course if you don’t heat all the rooms the heated rooms lose more heat to their unheated neighbours and thermal comfort decreases due to having a colder surface (radiant heat loss front the body increases asymetrically to that wall) but overall less energy use I expect.
I know this is a long shot, and I’m not expecting a complete answer, but I’d like to ask a few questions.
1) Could you provide a picture of exactly how you put the parts together? I.e. which parts were soldered where? Did you need a resistor between the power and the temperature sensor?
2) Would you have any idea how to also monitor the humidity? I’ve seen the DHT22 suggested as a good part to do this, but could I swap the temperature sensor you’re using for this and still have it work?
I come from a programming/web development background, so I get the programming part, but the physical setup of the parts is a bit confusing to me.
Anyway, like I said, I’m not expecting that much, but any help you could provide would be greatly appreciated!